Wednesday, February 22, 2017

Birthday Pillow

This birthday pillow for my niece was started MONTHS ago but I finished it today--just 4 days before her birthday! Yay. Now can I get it mailed today also?? (I'll work on that in a bit.)

This pillow combines 2 patterns from Colourwerx designed by Carl and Linda Sullivan, formerly of Linderella's Quilt Works in Southern Pines, NC. I always shopped in their store for the beautiful array of Kaffe Fasset fabrics they had. So this dog, flower, background and patterns are all theirs!

You can see that I didn't make the quilts as shown in the patterns but I did want to test them so I made one dog and one flower. 

The back of the pillow is overlapped envelope style.

The quilted piece was trimmed to 14 3/4" x 28 3/4". The pillow form is 14" x 28".

I added a dog tag with an S for Sasha.

I originally wanted to make a big yellow flower but the yellow got lost even though the background is a very light lavender so I switched to a red flower.

This pillow will be sent to my 8 year old niece who lives in a house with many cats. This will be her only dog and this dog won't chase the cats nor bark at them. 


Wednesday, February 15, 2017

Auntie Bee's Purse Step 6 Binding and Finished!

This purse is nearly done now. The binding is the worst part of the whole process. I've made this purse 7 times now and each time I've tried a different type of binding. I tried everything from my favorite method of French binding all machine done to traditional binding that is hand stitched. It ALL comes out untidy and icky in my opinion. However, it is hidden on the inside of the purse. That's a blessing. For this purse I prepared 2 yards of bias French binding cut 2.5" wide and I sewed it on with my favorite regular 1/4" foot. This method worked pretty well since this foot is less bulky than the walking foot.
The binding goes around the edges and around the top curves. Start in the center of one long straight edge. Leave a short tail to tuck the other end of the binding into.

Once the French binding is sewn to one side of the seam then it's easy to just flip it over to the other side and sew it down. Just force it into submission!

This is my overlap where one end is tucked into the other.


Ugly corner mess...

.......but it's attached! Yay.


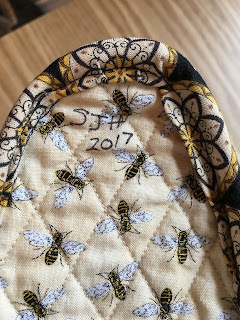
The curve is always messy. I signed the purse up in this tippy top spot.

For the bottom stiffener I used a piece of cutting mat cut 4" x 8" with corners rounded.

When you turn the purse right side out slip the stiffener in the bottom of the bag.

"Bee Grateful"! Indeed. And always BEE POSITIVE!

Strap construction: cut fabric 5 1/4" x 27" and cut fusible fleece 2 1/2" x 20". Fold in 1/2" on each short end and press. Then fold lengthwise in half, press, fold each side in again and press. Lay the fusible fleece in the center and fuse. It should be about 3" away from each end. Then fold the long sides to the middle, and fold the whole thing in half again. Sew around perimeter with a topstitch.

I added 2 snaps on each end of the strap just below the fleece, and the corresponding part of the snap just above the 1/2" hem. This photo shows both ends and one is face up and one face down.

The strap goes through the buckle and snaps.

For the zipper pull cut fabric 1.5" x 5", double fold, sew down the unfolded side to secure it. Put through zipper ring and sew across it to secure it. 
Finished!


I hope Auntie Bee likes her purse. 


Tuesday, February 14, 2017

Auntie Bee's Purse Step 5 Assembly and Top Zipper

The purse will be almost complete after this step but this part is easy and fun. No worries here.
Make 2 tabs. Cut 2: 5 1/2" x 4". Fold in half and press, fold short ends in to the fold line and press. Sew a line of topstitching along both sides.

Set these tabs aside for use later!

Align top front and top side piece, baste sides to front using a 1/4" seam from the top to the bottom corner. 

This shows both sides sewed to the front piece. Repeat with the back piece.

Measure 6 1/4" from lower corner and mark a line on the bottom piece. Cut ON that line. Repeat for both bottom pieces.
Sew the 2 bottom pieces together with a 1/2" seam. Press it open and carefully top stitch the edges of the seam down.

This shows the seam open and topstitched. (The bottom is not attached to the sides yet.)


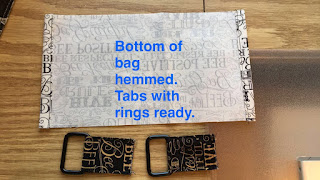
Hem both short ends of a  10 1/2" x 5" bottom fabric. Put the tabs through the rectangle "buckles" and sew a line near the buckle to secure.


BASTE THE QUILTED BOTTOM OF BAG TO THE FRONT OF THE BAG. DONT SKIP THIS STEP OR YOU'LL BE SORRY! Hahahaha I love how I wrote that on my notes to myself.

Now that the seam has been basted, center the prepared bottom piece and sew it in place. Sew it to the other side of the bottom but DON'T sew the back/bottom seam yet! 

The back and bottom seam remains OPEN!

Un-baste about 3"at top sides--all 4.

Pin zipper to bag front, sew, turn, topstitch.

Topstitch zipper.

With zipper still closed pin it to the back of the bag and sew. Open zipper, turn and topstitch.

The prepared tabs go here. With the ring hanging down inside align the top of the tab over the zipper and sew.

OPEN zipper a little and sew the other tab the same way.

Re-pin sides of bag to zipper/tab to fit. Sew.

It will look goofy but just sew it with a 1/4" seam.

Trim off the extra above the sewing line.

Open zipper. Pin and sew the last bottom seam closed.
Now the purse  is nearly done. The next step is horrendous, truly horrendous but don't let me scare you away from finishing! 

Monday, February 13, 2017

Auntie Bee's Purse Step 4 (Back Zipper)

Is anyone playing along with me??
Take the back of the purse and cut 4" from top to make the zipper opening.

Sew the zipper  to the lower edge of the upper piece, turn and topstitch.

Note: for Auntie Bee's purse make the zipper close on the LEFT side because she likes her purse on her RIGHT shoulder and that way it will be facing forward as she wears it. 
(I would do it opposite because I carry my purse on my left shoulder.)
Sew binding across the TOP of the back pocket piece.

Lay the lower back pocket piece face down over the zipper with the binding laying on the edge of the lining. This will be sewn to the area right above the zipper. Pin well. 


Sew a line of topstitching along both sides of the binding through all layers to attach back zip pocket.

Put a mark on the zipper where the edges of the purse are.

Open zipper and sew lower back panel between marked areas. Topstitch.

The edges are now uneven since we added the zipper so baste the pocket and back pieces together and trim the extra piece off. (I could probably go back and figure out where that stupid extra half inch belongs and adjust the measurements but this way works too.)

Now we've got the front of the purse with inner pockets already sewn and the back of the purse with the zipper pocket done. Next step will be assembly of the purse and the top zipper.