Wednesday, April 30, 2014

Bathrobe blocks Progress update

I took a quilt (needing to be washed) and laid it white side up on the floor. Then I got my box of blocks and started laying them out to see how much space they would cover. The quilt in the photo is 78 x 78. I'm about halfway through making one each of the Free Patterns on the Quiltville Quips & Snips website so there will be many more blocks to come!!! This arrangement was just to see how much area the blocks occupied. I didn't try to make this attractive at all! And of course I would need some sashing to help set this together. So don't despair that I have an ugly quilt happening. This is a work in progress.

I think maybe I will have to either make one huge sampler quilt or make a two sided sampler. 
I'm not sure I can make a bathrobe out of these blocks. Maybe I will just choose a few...

While I was laying the blocks on the quilt I instructed my two "helpers" to just watch:

And they did watch. They were very patient. So sweet!!


Tuesday, April 29, 2014

Bathrobe block 36--Out On A String

OK now this challenge is getting to be a challenge! Remember how I said I don't care for triangles? Well bias edges take a close second! This block was tough!!


The star points are pieced on a foundation paper cut from a telephone book. 
My first problem was that I didn't have the same ruler the directions called for.
My diamond ruler had markings and numbers so I used the #3 and cut my foundation papers.
All was peachy keen until I made the corner units. Too small for my diamonds!!
(The finished block should be 10.25" but mine is 12".)
Somehow my diamonds are too big so I had to figure out what size the corner squares were.
Once I got the corners figured out I needed the side triangles. Got that too.
So I carefully pieced the whole block being very careful not to stretch the diamonds.....

Look at the center lift I've got going! 
I could hide a spool of thread under this block.
It's not supposed to do that.


My solution for now was to get it wet and press it flat.....
Challenging....


Bathrobe block 35--Oklahoma Backroads

To clarify my mission: I'd like to make a bathrobe out of lots of different blocks like a sampler quilt. The Quiltville Quips & Snips web site had loads of wonderful FREE patterns under the link at the top labeled Free Patterns! There are about 62 free patterns and I'm going through them alphabetically making at least one of each. I have a feeling that I will have way too many for a bathrobe and might need to make it into a sampler quilt but for now it's called the Bathrobe Challenge.


The style of this block is usually called Road To Oklahoma but Bonnie Hunter changed the darks and lights so she called it Oklahoma Backroads.
Very easy to piece because it was all squares and rectangles. Even the White triangles started as squares. This is an 8" block.


Monday, April 28, 2014

Bathrobe block 34--Ohio Stars & Rails


This is a 6" Ohio Star block that alternates with a 6" block of rail fence. 
When done in the red white and blue it is very dramatic and beautiful.

Sunday, April 27, 2014

Bathrobe block 33 Ocean Waves

This Ocean Waves block took a while to put together since I'm not a fan of triangles.


It was easy to cut 2 1/2" squares from my  bali pop strips for the dark triangles. 
I can see now why Bonnie Hunter has her scrap system of pre cut strips of various sizes.
It took a bit of time to cut a bunch of the different white squares since I didn't have pre cut strips.


Friday, April 25, 2014

Bathrobe blocks 31, 32--My Blue Heaven, Nine Patch Split


Back from spring break where we visited family and toured some houses, did a little sewing and a lot of dog walking. Sasha was a terrific traveller. She didn't whine once on the long car ride. That's more than I can say for the humans in the car, myself included.


These are the two blocks that comprise the "My Blue Heaven" quilt. I did my blocks in blues also because it just wouldn't be right if my blocks were Red or Green when the pattern is Blue!


This nine patch block is half darks and half lights. I only made one of these blocks but I might do a few more to get the feel of the pattern when they are put together.


This is the pretty braided border for the Nine Patch Split block. The directions for this are on the lower section of the page. It is really easy to piece but it gets a bit unwieldy when it gets long so I rolled it up and pinned it to keep it from flopping around. This would make a nice lower bathrobe border. I didn't trim off the excess because I might make it longer once I determine where it will go.


Saturday, April 12, 2014

Vacation Project

I'm taking a break from Bonnie's Free Pattern blocks on Quiltville while I'm in NC searching for a new sewing room to call home......  But I did bring a project to work on.

This will kinda be like the Scrappy Trips block but I am using rectangles instead of the traditional squares. The finished rectangles are 1" x 2". These are what I call the UP Hill blocks.


These are my Down Hill blocks. If you use squares you don't have to worry about up and down because they can be rotated sideways. All these blocks will have the black diagonal thru the center and then white 2 rows over. 

Sasha is tired from a long walk around the golf course in the heat. 
She was an excellent traveller driving down here. 
We were in bumper to bumper traffic from DC to Fredericksburg, VA. 

We left after school at 2:22 and didn't arrive until 10:45! 
It's usually 5 1/2 hours driving plus a 1/2 hr eating stop.
We stopped for dinner at 6:26 BEFORE we even got to Richmond!! UGH
But it's SO beautiful here! Sunny and hot--just how I like it. Smile...

Tuesday, April 8, 2014

Designer steering wheel cover Tutorial

Don't we all love the beautiful Vera Bradley prints? Sometimes the patterns are TOO busy to carry around as a purse but who can resist having that gorgeous fabric on your steering wheel? This will keep your steering wheel cooler to the touch in summer and warmer in winter. It's easy to put on and take off too. (My husband and 17 year old son refuse to drive with it on.)

  The Vera Bradley Napkins are 100% cotton, measure 20" x 20" and cost $6. (Less if you get them on sale, on eBay, or at an outlet.)

Supplies:
One Napkin or about 6" x 50" of cotton fabric
1/4" elastic x 60"
Non slip grippy stuff (used as shelf liner? or drawer liner? or under rugs) 3" x 50" (bought by the yard at JoAnn's)
Safety pins-one small and one large
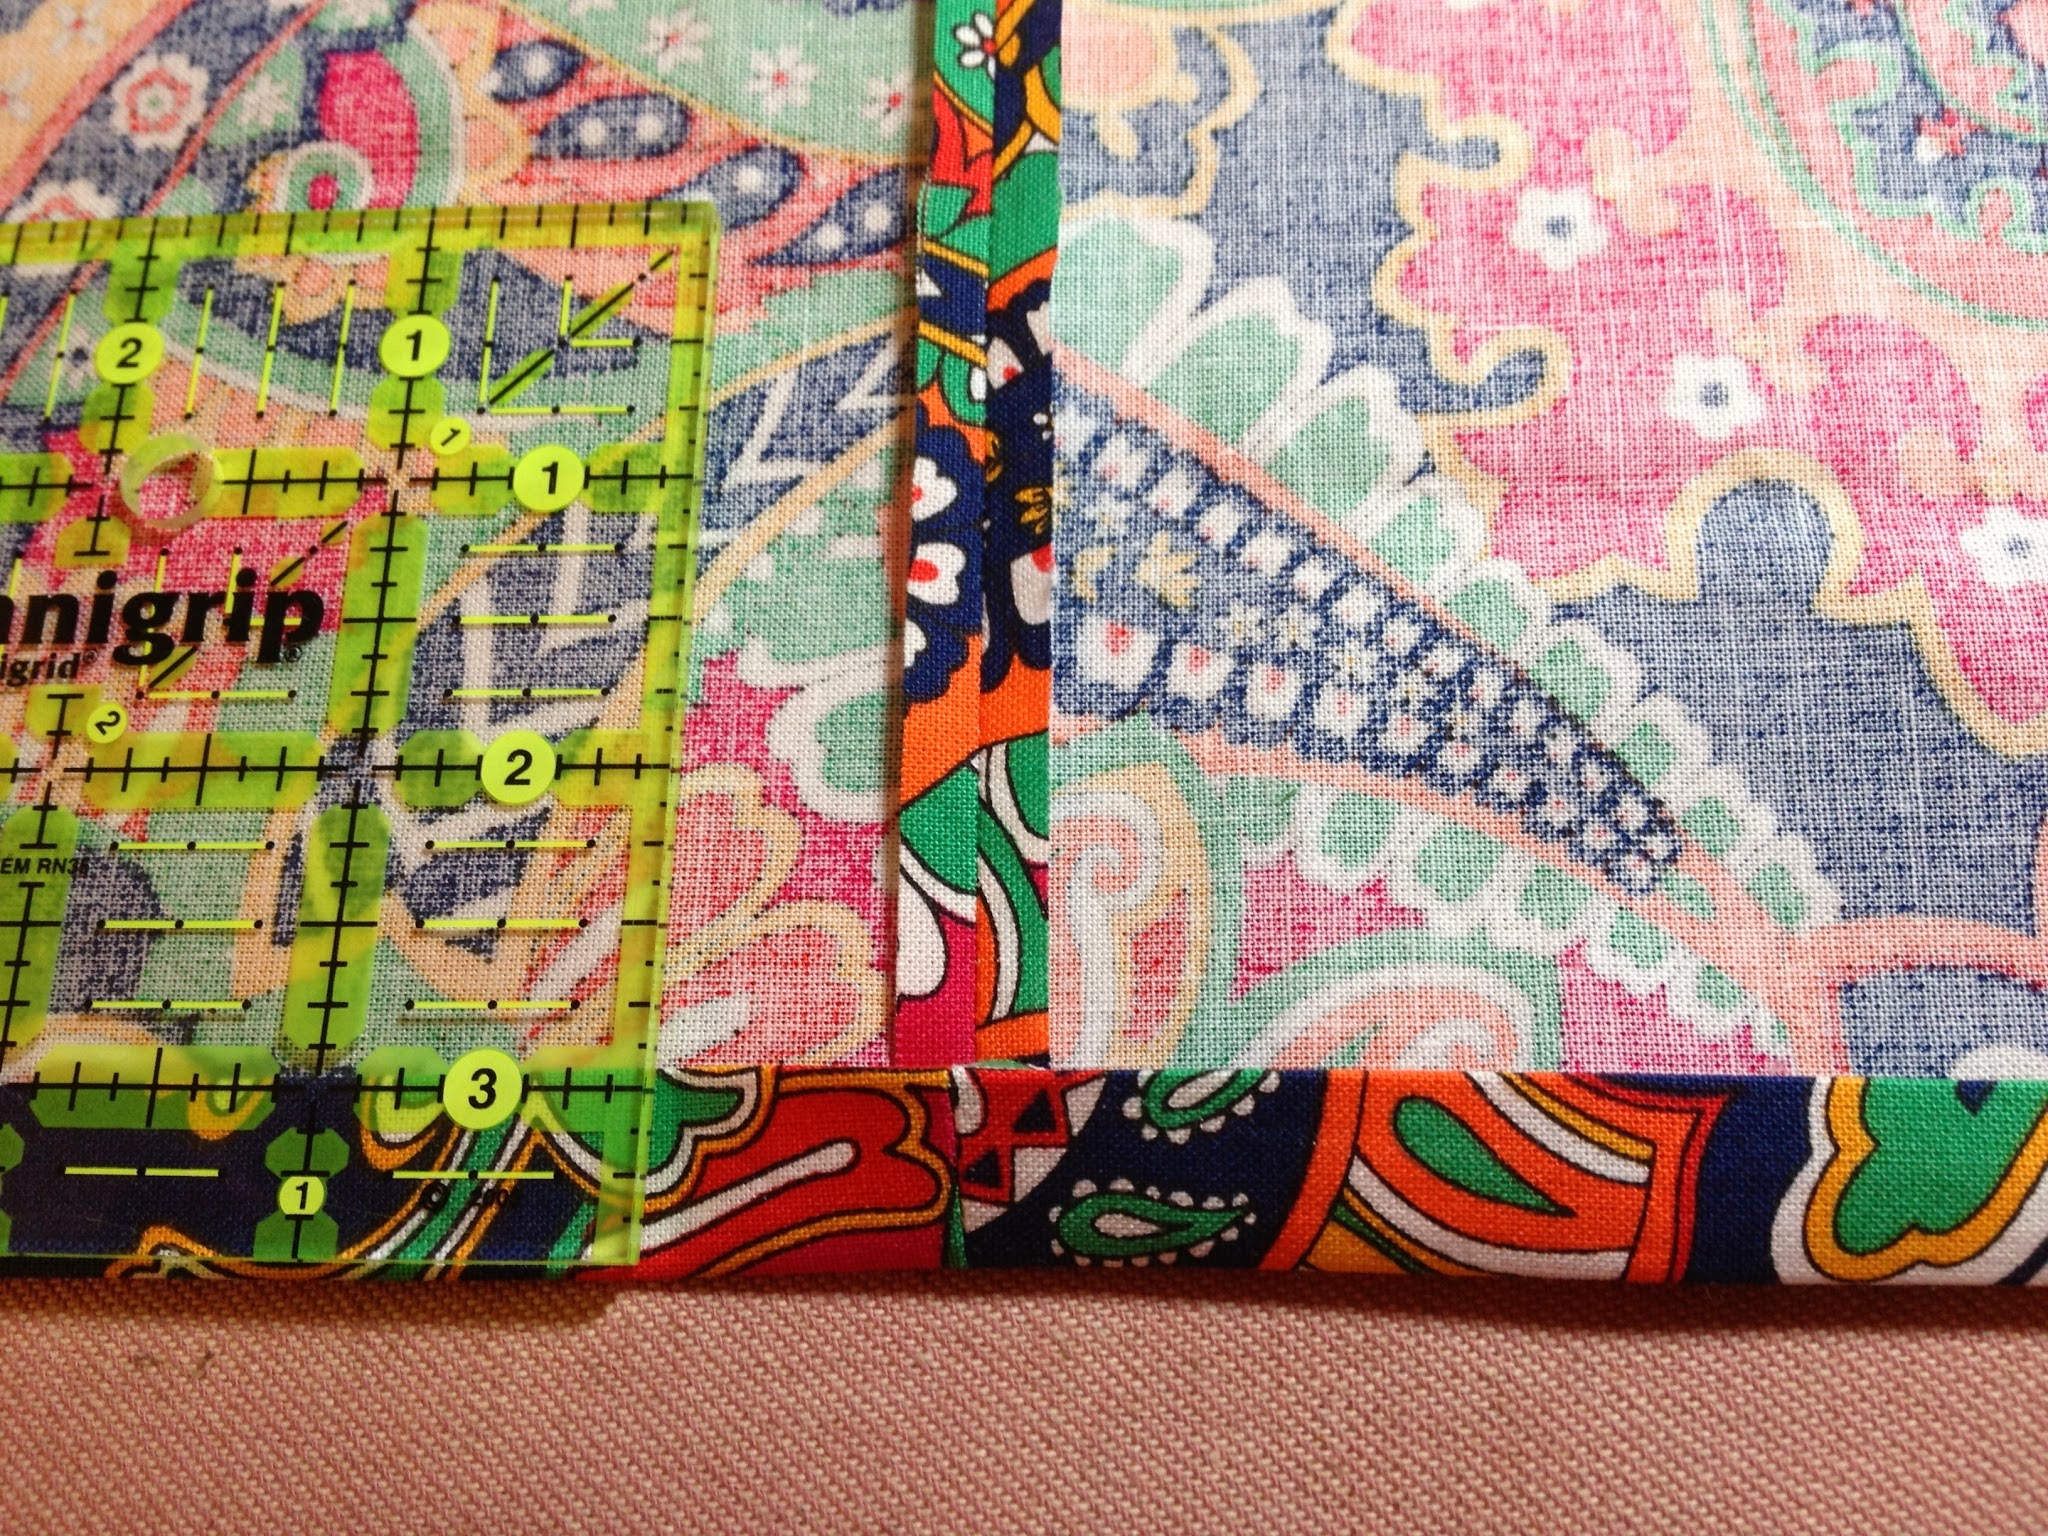
rotary cutter, ruler, mat
tape measure
sewing machine
thread to match


Cut a piece of fabric 6" wide x steering wheel circumference plus 3/4".  Measure your steering wheel circumference with a tape measure or use a piece of string and then measure that. My wheel is 46". So I would need a piece of fabric 6" x 46 3/4".


Trim off the binding on the napkin edge. Cut 6" x 20" twice. Then cut another piece 6" x 10". Once sewn together this length will need to be trimmed to your steering wheel measurement plus 3/4".
And you will have some leftover for another project.


Sew the pieces end to end with 1/4" seams and press them open. Measure 46 3/4" (OR what your wheel measures plus 3/4") and trim any excess off. 


Fold up 1/4" on each long side and iron.


Fold that ironed fold up 1/2" and iron that too.


Top stitch along the edge of the fold to create the casing for the elastic.


You need TWO pieces of elastic each 30" long. I used 1/4" soft stretch elastic. 


Prepare the elastic to be threaded into the casing by putting a narrow safety pin on one end and a large pin as an anchor on the other. Set aside.


Cut a piece of non slip grippy stuff (sold at JoAnn Fabrics by the yard)
 3"wide x your wheel measurement. (3 x 46)
Lay it on the wrong side of the fabric,  about 3/8" or so from the end, and pin each side to hold it there.


Flip it over carefully and sew down the center of the fabric to anchor the grip.
I used my walking foot and a serpentine stitch.


After the center is anchored, sew each side down, removing pins as you go.


The stitching is not very visible on the pretty side so straight or wavy doesn't matter.


Now thread the narrow safety pin into the casing and push it as far as you can by scrunching the fabric up. Then pull the end of the fabric down while holding the head of the pin.


Continue pushing and pulling until you get to the other end. The large safety pin will act as an anchor so the far end of the elastic will stay at the other end and not travel up the casing too.

Sew across the elastic and casing at each end before removing the pins.


Once the elastic is securely sewn, remove the pins and  repeat for the other side.


Almost done!
 Pin the raw ends with right sides together and sew a 3/8" seam. Backstitch at each end.


Push the seam to one side and sew it down.

"Venetian Paisley"

"Clementine"

"Heather"


These steering wheel covers are not stretchy.
 A 46" wheel cover will not fit a 47" wheel.
 The elastic just makes the cover curl in.
Enjoy!

Lynn is selling these on Etsy here: Holman's Creations

Monday, April 7, 2014

Bathrobe blocks 28, 29, 30--Lozenges, Maverick Stars, Millenium Pyramids

This years Leader & Ender challenge block is Lozenges. As I was cutting plaids for another quilt I cut a bunch of rectangles for this block. This is a preview of what my quilt would look like.


I used precut 2" squares of civil war fabrics for the corners. I wasn't sure what type corner fabrics would go well with all the plaids but the civil war fabrics have a masculine feel as do the plaids. I picked 4 of the "happiest" plaids for this sample because it will be part of the Bathrobe project.


This block is really cute. I like the wonkiness of it. The final suggestion for the block is to put your square ruler over the block at an angle and trim. I chose not to (at this time) because I didn't want the edges to be biased. Notice the civil war fabrics in this block? That's because I still had them out when I started this block. All the star points came out of my "trash scraps" bin.


Besides Death and Taxes there are 2 more certainties in my life--I love palm trees and I hate triangles.
I guess triangles have their uses like making star points but to just cut triangles upon triangles with all those bias edges...yuck. But I gave it a go and here are some pyramids. Not a millennium worth but a few. See my pyramid climber?


This is my millennium quilt. I used 2,000 SQUARES and NO triangles!
It looks like I put a nine patch border around the outside but that would make an odd number, not 2,000 even. So look closely at the center rows. Horizontally at the center there is a row of 2 instead of 3 and vertically thru the center there is row of 4. It's set 40 x 50 to equal 2,000. This was a fun challenge to arrange 2000 squares into a pattern. Looking at this quilt now I can tell you I've added a LOT more yellow to my stash. I started quilting in 1991 (right before my son Christopher was born) and made this quilt in late 1999, so I only had 8 years of fabric. Chris is now 22! And my stash has grown too. Back then I had to ask friends for help in getting to 2000. Now... easy!!


Sunday, April 6, 2014

Bathrobe blocks 25, 26, 27--Jared Takes a Wife, Little Monkey, Kiss In The Corner

These blocks were an interesting mix. Jared Takes a Wife was super simple because I had already made 13 of them for my Batiks Rule quilt. The Little Monkeys were easy and adorable but I pondered over how much Kiss In the Corner I needed to make for the pattern to emerge.


This block was fast because I knew how to do it and I had leftover pieces from the Batiks Rule quilt.


Batiks Rule! Waiting to be quilted. 


These blocks are really simple and fun. Bonnie Hunter says on her blog to just use any fabrics and not try to match colors. It does make block building easier and so much more pleasing than planned. You might get interesting things like the spin on the 3rd block because of the stripe fabric. 


This is one "block" that is the beginning of Kiss In the Corner. The "Kiss" appears because of the sashing. I made four blocks and sashing to go around it.


See how there is a spinning "friendship star" in the center of the quilt sample?
That (I think) is the Kiss. It's not exactly a Friendship Star because the dark triangle is smaller than usual but that is what makes it a Kiss instead of a Star. (I guess.) 

This is getting easier to make the variety of blocks as I go because I have so many leftover pieces from previous blocks. Many of the neutral squares above were cut for the Dancing Nine Patch block.

Friday, April 4, 2014

Blocks 20 to 24--Happy Scrappy Houses, Hexagon Pincushion, Hidden Spools, Hidden Pinwheels, I Spy a 4 Patch

Here are another 5 blocks--alphabetically-- Happy Scrappy Houses thru I Spy a Four Patch.


This house block was easy to do but I'm not pleased with how it turned out. 
I wanted a vine covered house but it just looks lost. Maybe if I had chosen a solid yellow for the window and a plain door it might have worked.


This block was different because it involved hand sewing--not my favorite.
I drafted the hexagon papers needed and proceeded as directed. 
I watched Survivor on the DVR while I did the hand sewing.


I read through the directions a few times for this block. Near the end Bonnie Hunter mentions that she would like to try the block in a smaller size and the pattern could be done in 2 colors like red and white. I already had some 1 1/2" strips cut in red and white so this is what it looks like in red/white in the smaller size mentioned. I like the blocks but with all the bias edges I chose to put a simple border around it now so it doesn't get ruined with handling before I set it into the quilt.


I don't think I'd ever want to make a whole quilt out of this pattern because the entire outer edge is bias--and stretchy. I put a border around this block right away so it won't get distorted with handling.
I did have fun adding silly fabrics--see Tigger? a jack-o-lantern? the card army from Alice In Wonderland? baseballs? ants? I don't get the hidden pinwheels because I didn't want to make that many blocks.


This block is simple and fun. I pulled out my bag of letter fabrics for the four patches and the larger patches too. I spy the words UP and HI.

So my Bathrobe Box has at least 24 blocks in it. In many cases I've made more than one block. There are at least 62 blocks listed under the Free Patterns tab on the Quiltville blog. I'm going through them, in order, as they are listed.